Git 命令备忘

对 Git 常用命令归类总结,方便查阅。

Git 配置

1
2
3
4
5
6
7
8
9
10
11
12
13
14
15
16
git config --global user.name "zywudev" # 全局用户名

git config --global user.email "zywu.dev@gmail.com" # 全局邮箱

git config user.name "zywudev" # 某一个项目使用特地的用户名

git config user.email "zywu.dev@gmail.com" # 某一个项目使用特地的邮箱

git config --global alias.co checkout # 别名

git config --global alias.lg "log --graph --pretty=format:'%Cred%h%Creset -%C(yellow)%
d%Creset %s %Cgreen(%cr) %C(bold blue)<%an>%Creset' --abbrev-commit --date=relative" # 日志

git config --global color.ui true # git 着色

git config --global core.quotepath false # 设置显示中文文件名

Git 常用命令

1
2
3
4
5
6
7
8
9
10
11
12
13
14
15
16
17
18
19
20
21
22
23
24
25
26
27
28
29
30
31
32
33
34
35
36
37
38
39
40
41
42
43
44
git # 查看 git 是否安装成功

git init # 初始化仓库

git status # 仓库状态

git add <file> # 将文件添加到暂存区

git add . # 将所有修改过的文件添加到暂存区

git rm --cached # 删除缓存,但不删除文件

git rm <file> # 删除文件

git commit -m “first commit” # 提交

git log # 可以查看所有产生的 commit 记录

git tag v1.0 # 给当前代码打标签

git tag # 查看历史 tag 记录

git checkout v1.0 # 切换到 v1.0 的代码状态

git diff <$id1> <$id2> # 比较两次提交之间的差异

git diff <branch1>..<branch2> # 在两个分支之间比较

git diff --staged # 比较暂存区和版本库差异

git checkout -<file> # 抛弃工作区修改

git checkout . # 抛弃工作区修改

git stash # 当前分支暂存

git stash list # 列所有stash

git stash apply # 恢复暂存的内容

git stash drop # 删除暂存区(删除一条)

git stash clear # 清空暂存区

分支管理

1
2
3
4
5
6
7
8
9
10
11
12
13
14
15
16
17
18
19
20
21
git branch # 查看分支情况

git branch a # 新建 a 分支

git checkout a # 切换到 a 分支

git checkout -b a # 新建 a 分支 自动切换到 a 分支

git merge a # 将 a 分支合并到当前分支

git branch -d a # 删除 a 分支,a 分支已被合并

git branch -D a # 删除 a 分支,a 分支未被合并

git branch -r # 查看远程分支列表

git push origin:<branch> # 删除远程分支

git checkout a origin/a # 本地没有 a 分支的情况下,将远程 a 分支迁到本地

git checkout -b a origin/a # 把远程分支迁到本地顺便切换到该分支:

远程管理

1
2
3
4
5
6
7
8
9
10
11
git push origin master # 把本地代码推到远程 master 分支

git pull origin master # 把远程 master 代码更新到本地

git clone git@github.com:zywudev/weather.git # 远程 test 项目 clone 到本地

git remote add origin git@github.com:zywudev/test.git # 本地已用项目与远程test项目关联,提交到远程test项目

git remote -v # 查看当前项目有哪些远程仓库

git remote show origin # 查看远程服务器仓库状态

GitHub Pages + Hexo 搭建博客

第一篇博客,记录一下博客搭建过程。

安装 node.js

node.js

安装 Git

Git

安装 Hexo

在文件夹中建立名为 hexo 的文件夹,右键打开 Git Bush,使用 npm 安装 Hexo。

1
npm install hexo-cli -g

初始化 blog, Hexo 自动在 blog 文件夹下创建网站所需文件。

1
hexo init blog

进入 blog 文件夹,安装依赖包。

1
2
cd blog
npm install

生成静态页面

1
hexo g # 或 hexo generate 

启动本地 web 服务

1
hexo s # 或 hexo server

此时在浏览器地址栏中键入 http://localhost:4000/ , 可以看到内置的页面。
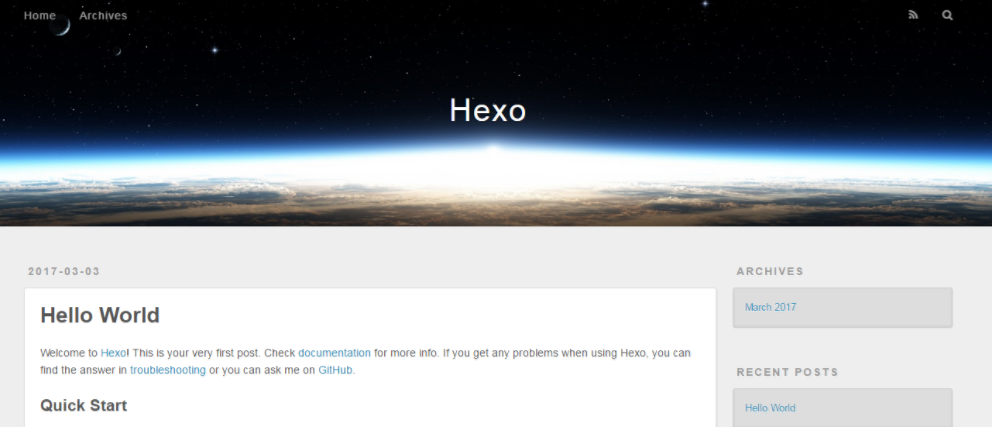
hexo-init-page

GitHub Pages 设置

注册 GitHub 及其使用可以参考 从 0 开始学习 GITHUB 系列汇总

在 GitHub 上创建仓库,而且仓库的名字格式为: username.github.io,username 与 GitHub 账号名对应,每个帐号只能有一个仓库来存放个人主页。可以通过 http://username.github.io 来访问个人主页。

部署 Hexo 到 GitHub Pages

其实就是将 Hexo 生成的静态页面提交 (git commit) 到 GitHub 上。

在 Hexo 根目录下的配置文件 _config.yml 中进行修改:

1
2
3
4
deploy:
type: git
repo: git@github.com:zywudev/zywudev.github.io.git
branch: master

还得安装一个扩展

1
npm install hexo-deployer-git --save

然后在命令行部署

1
hexo d

Hexo 主题基本配置

选择喜欢的主题。Hexo 官网主题。我的博客选用的是 NexT 主题,官方提供了详细的使用文档

下载 NexT 主题

1
git clone https://github.com/iissnan/hexo-theme-next themes/next

启用 NexT 主题

克隆完成后,打开站点配置文件 __config.yml,找到 theme 字段,修改为:

1
theme: next

站点配置文件:博客目录下的 __config.yml 文件。

主题配置文件: themes/next 目录下的 __config.yml 文件。

启动本地 web 服务验证

1
hexo s --debug

至此,即完成了基于 GitHub Pages + Hexo 的个人博客框架搭建。

博客推广

将个人博客推广到 Google 搜索引擎上。

验证网站

推荐文件验证。

下载 HTML 验证文件,将该文件放到博客 source 目录下。

hexo 编译文件时,会给下载的 HTML 文件中添加其他的内容,导致验证失败,所以需要在文件开头添加 layout: false 来取消 hexo 对其进行的转换。

1
2
layout: false   ---
google-site-verification: googleb6fc53a32f5418d9.html

部署到 GitHub,输入https://zywudev.github.io/googleb6fc53a32f5418d9.html , 能访问即可点击验证按钮进行验证。

站点地图

站点地图是一种文件,您可以通过该文件列出您网站上的网页,从而将您网站内容的组织架构告知 Google 和其他搜索引擎。Google 等搜索引擎网页抓取工具会读取此文件,以便更加智能地抓取您的网站。

使用 hexo-generator-sitemap 插件来生成 Sitemap,执行

1
npm install hexo-generator-sitemap --save

执行

1
hexo g

博客根目录的public下面生成了 sitemap.xml 。如果没有,在博客目录的 _config.yml 中添加如下代码重新编译

1
2
sitemap:
path: sitemap.xml

要将博客目录 __config.yml 中的 url 字段设置为自己的域名

1
url: http://zywudev.github.io

部署到 Github,访问 https://zywudev.github.io/sitemap.xml

提交 sitemap 到 Google站长工具,找到添加站点地图按钮,添加 sitemap.xml 即可,如下图。
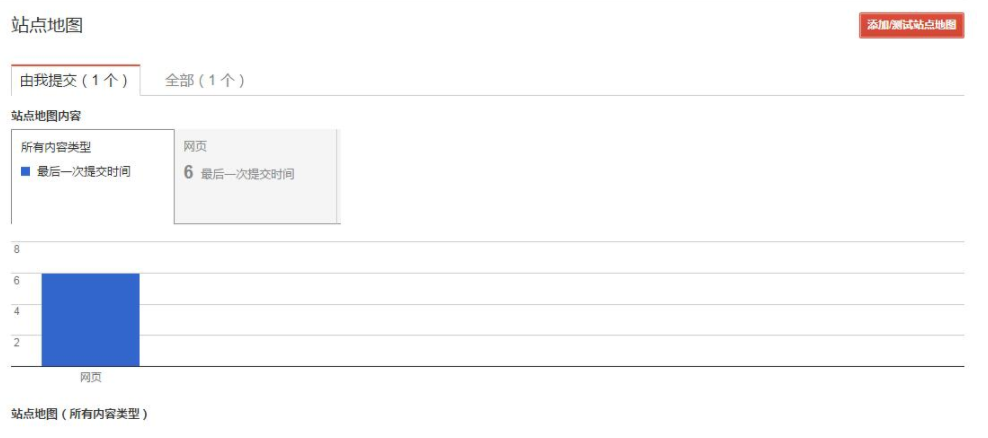
google-sitemap

博客优化

添加 about 页面

1
hexo new page "about" 

\source\about\ 目录下会生成一个 index.md 文件,添加个人信息即可。

添加分类、标签页面

1
2
hexo new page "categories"
hexo new page "tags"

博客标题、作者等

打开站点配置文件

1
2
3
4
5
6
title: Wu's blog 
subtitle:
description: O ever youthful,O ever weeping
author: Wu
language: zh-Hans
timezone:

修改文章内文本链接样式

将文本链接设置为蓝色,修改
themes\next\source\css\_common\components\post\post.styl,
添加

1
2
3
4
5
6
7
8
9
.post-body p a{
color: #0593d3;
border-bottom: none;

&:hover {
color: #0477ab;
text-decoration: underline;
}
}

通过网站 favicon在线制作 网站制作 favicon 图片。

将图片放在博客 source 目录下即可。

添加 Fork me on GitHub 挂件

官网选取样式。

拷贝代码,修改 href 地址为自己的 GitHub 地址

1
2
3
<a href="https://github.com/you">
改为:
<a href="https://github.com/zywudev">

修改文件: themes/next/layout/_layout.swig,将代码拷贝至对应位置。

1
2
3
4
5
6
7
8
9
10
11
12
13
14
15
16
<body>

{% include '_scripts/third-party/analytics.swig' %}

<div class="{{ container_class }} {% block page_class %}{% endblock %} ">
<div class="headband"></div>

<!--------------add Fork me on GitHub ------------->

<a href="https://github.com/zywudev"><img style="position: absolute; top: 0; left: 0; border: 0;" src="https://camo.githubusercontent.com/8b6b8ccc6da3aa5722903da7b58eb5ab1081adee/68747470733a2f2f73332e616d617a6f6e6177732e636f6d2f6769746875622f726962626f6e732f666f726b6d655f6c6566745f6f72616e67655f6666373630302e706e67" alt="Fork me on GitHub" data-canonical-src="https://s3.amazonaws.com/github/ribbons/forkme_left_orange_ff7600.png"></a>

<!--------------add Fork me on GitHub ------------->

<header id="header" class="header" itemscope itemtype="http://schema.org/WPHeader">
<div class="header-inner"> {%- include '_partials/header.swig' %} </div>
</header>

参考链接

如何搭建一个独立博客——简明Github Pages与Hexo教程

手把手教你使用Hexo + Github Pages搭建个人独立博客

博客推广——提交搜索引擎